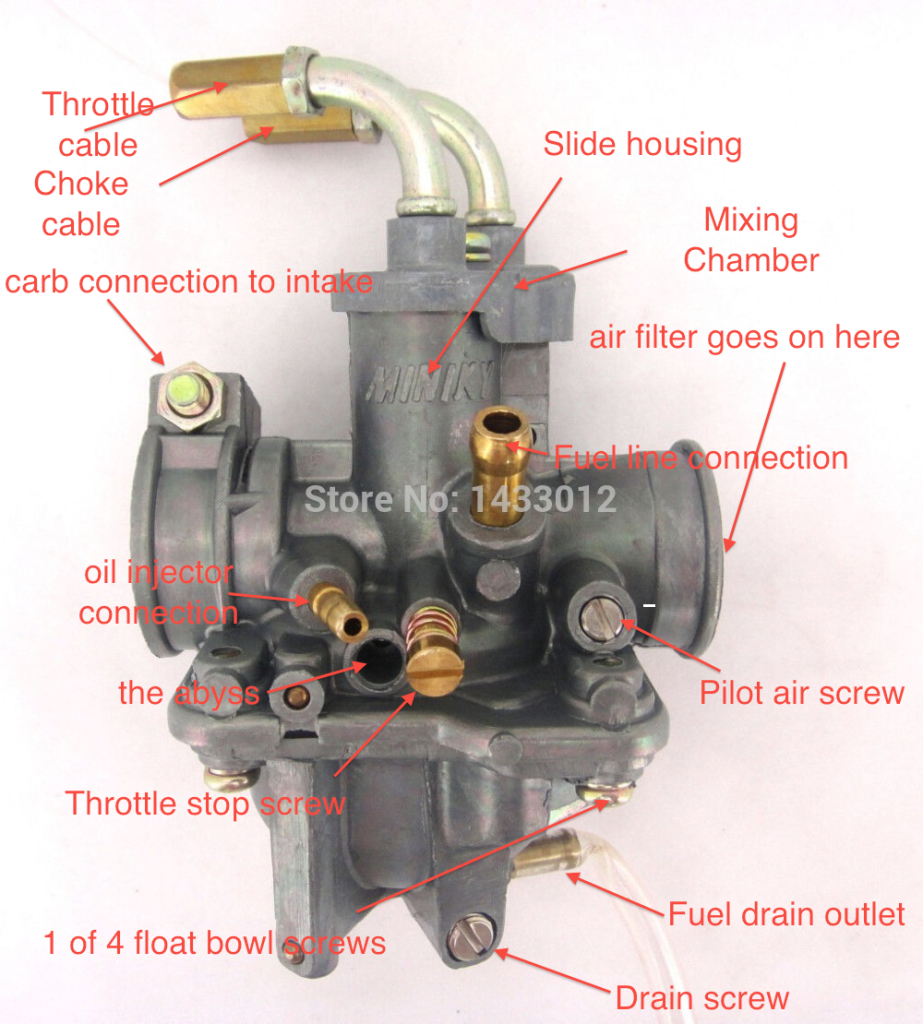
Here’s a QT50 carburetor that I labeled. This carb is actually a knock-off carb but is pretty much an exact reproduction of the stock carb. Some of the older stock carbs have the pilot air screw on the left side of the throttle stop screw. I’ll take a picture of the innards one of these days and label those parts as well.
You can buy a new qt50 carburetor here.
Basic carburetor adjustment procedure for the QT50:
1. Find what I’ve labeled the pilot air screw above (aka the air mixture screw);
2. Take a flathead screwdriver and turn it to the right until it just barely seats (stops turning). DO NOT CRANK IT DOWN. Be gentle;
3. Find where you insert the screwdriver in the screw and take a sharpie and put a small dot at one end of the indentation of the screw. It doesn’t matter which one. This is just to help count the turns of the screw. Now, take your screwdriver and turn it to the left 1 1/2 turns out. Each 180 degree rotation is half a turn. So you need a full 360 for a full turn;
4. The initial setting is 1 1/2 turns out. Try starting your bike. If it won’t start or won’t idle then turn the screw to the right 1/4 turn at a time until it starts and idles.
Notes: Turn the screw a 1/4 turn at a time and give the engine 15 or so seconds to react to the change before adjusting the screw again. The original Mikuni carb had the air mixture screw to the left of the throttle stop screw. You can always find the throttle stop screw under the slide chamber. Once you’ve done that, the air mixture screw is just the other one. Also, some models had an initial air mixture screw setting of 1 1/4 turns out. I will share a slightly advanced carb adjustment later.
More notes: Changes in the weather/seasons can require adjustments to the carb. Always adjust with air filter on. Different air filters will require different carb adjustments. Make sure air filter is securely on. Stock air filter/air box is known to not connect securely.
Throttle stop screw adjustment:
Now if you are paying attention, you will see that the throttle cable connects to the top of the slide chamber housing (mixing chamber cap) and to the slide. Underneath the slide is the throttle stop screw. This screw controls how high or low the slide sits in the slide chamber at idle. The higher the slide sits, the more air/fuel mixture goes through and the higher the rpms at idle. You want to adjust this after the bike warms up and you adjust it to where the back tire is just barely spinning or at a stop depending on your preference.
After the bike warms up and after you have adjusted the air mixture screw, turn the throttle stop screw 1/4 turn at at time (either left or right depending on what the rear wheel is doing). If your rear wheel is spinning then turn it to the left until it just stops. If it is not spinning, turn it to the right until it starts spinning and then back off the screw to the left until it stops. Turn the screw a 1/4 turn at a time and give the engine 15 or so seconds to react to the change before adjusting the screw again.
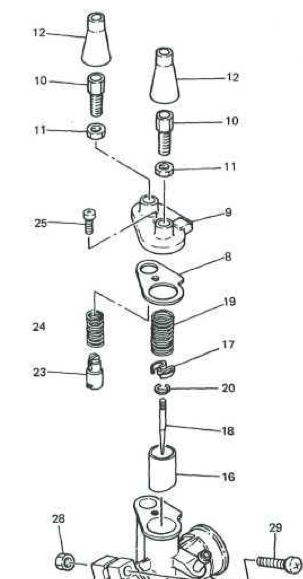
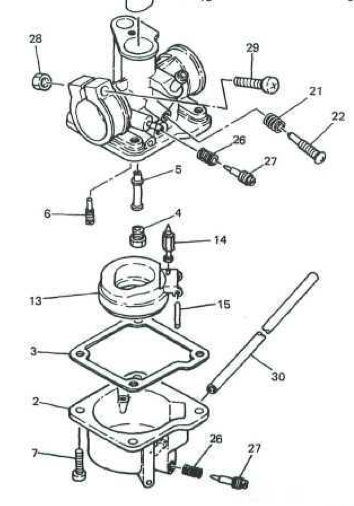
Now if you bought a new clone carburetor, another issue will be properly inserting the slide and choke into their chambers on the new carb. I remember being a bit intimidated by the thought of running the old throttle and choke cable through the new slide and choke so I just used the old slide, choke, and chamber cap on the new carb. That’s probably the easy way of doing things. Plus the new chamber cap often has different cable housings. The main trick is inserting the slide correctly into the slide chamber. If you look closely there’s a nub inside the slide chamber. There is also a corresponding groove in the slide. Insert the slide and rotate it around while pushing down slightly on the slide. When you align the slot with the nub, the slide will very easily and smoothly slide all the way down into the chamber and you will have plenty of room to get the cap back on. You should NOT have to crank the cap screw down in order to push the slide down. If you do, the slide is not properly inserted. Stop and try again.
Note: you may want to replace the old mixing chamber cap gasket with the new one from your new carb if you proceed as above. Hope this helps!
Advanced carb tuning
1. Now that you’ve tuned the carb according to what I’ve laid out above, we can move on to the next step.
2. With the bike running, turn the air mixture screw 1/4 turn to the left. Pause 15-20 seconds and let the engine react. If the rpms seems to get higher at idle, turn the air mixture screw to the left a little more. If rpms continue to get higher, repeat until the rpms no longer increase. You may get to a point where you have to back it off to the right again. Once you’ve found your spot where the rpms no longer increase (and if the bike is fully warmed up), the back tire should be spinning. Now go to the throttle stop screw and turn this to the left until the rear wheel stops spinning.
3. With this adjustment, your throttle response should be much better.
Or we can just borrow from the manual.