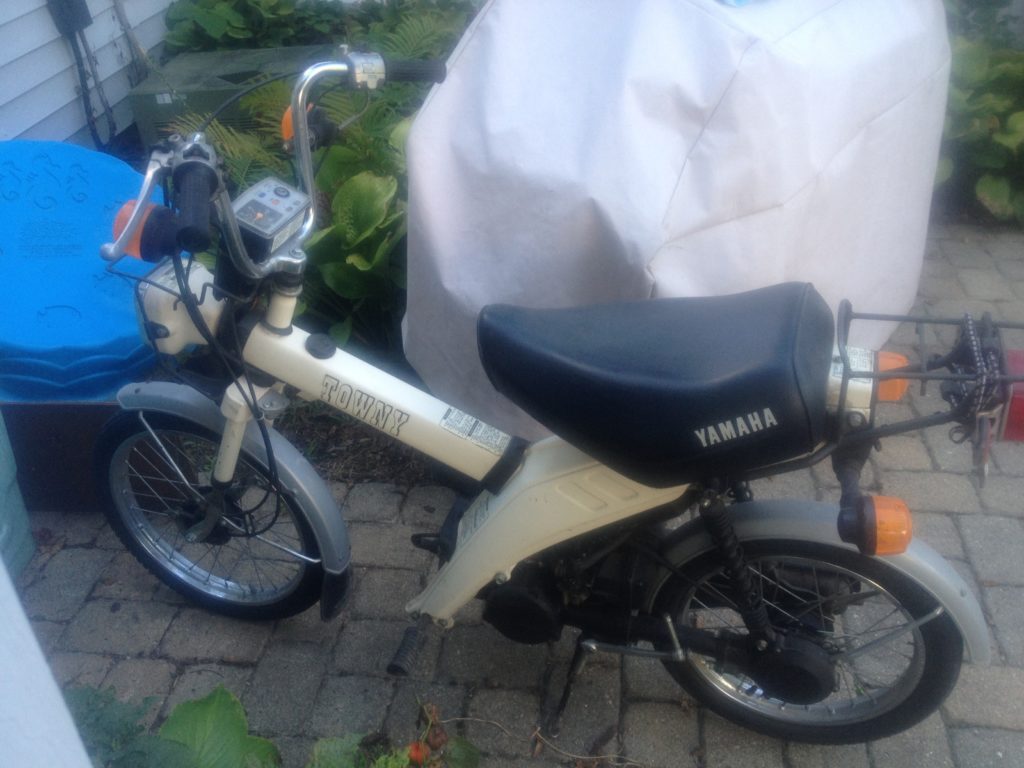
1982 Yamaha Towny MJ50
I just acquired this Yamaha Towny recently (10/1/16 date of writing this). I’ve been trying to find one within two to three hours of central Ohio for quite some time. You have to be pretty savvy with Craigslist because sellers will list them as a “Yamaha moped”; “Yamaha Scooter”; “moped”; “scooter”; etc. I’ve even seen them listed as a Yamaha qt50 before. I believe this white Towny was listed as a Yamaha moped by the seller. He probably had not received any calls on it because of his listing. Nobody found it. I stumbled upon it while on vacation and as soon as I returned, I jumped on it.
Luckily, I arrived a bit early because the seller was getting ready to power wash it. Never a good idea. It started and ran. It needed a new battery. I opted to replace the carb with a new one and I installed a new air filter. The old air filter housing was broken in half. I put on new tires. Fixed some loose wires. Later I discovered the two bolts holding the center stand on were broken so I replaced those. All the lights work and it runs like a champ.
Video of MJ50 running. Enjoy!
4/18/17 Exhaust options for the Towny
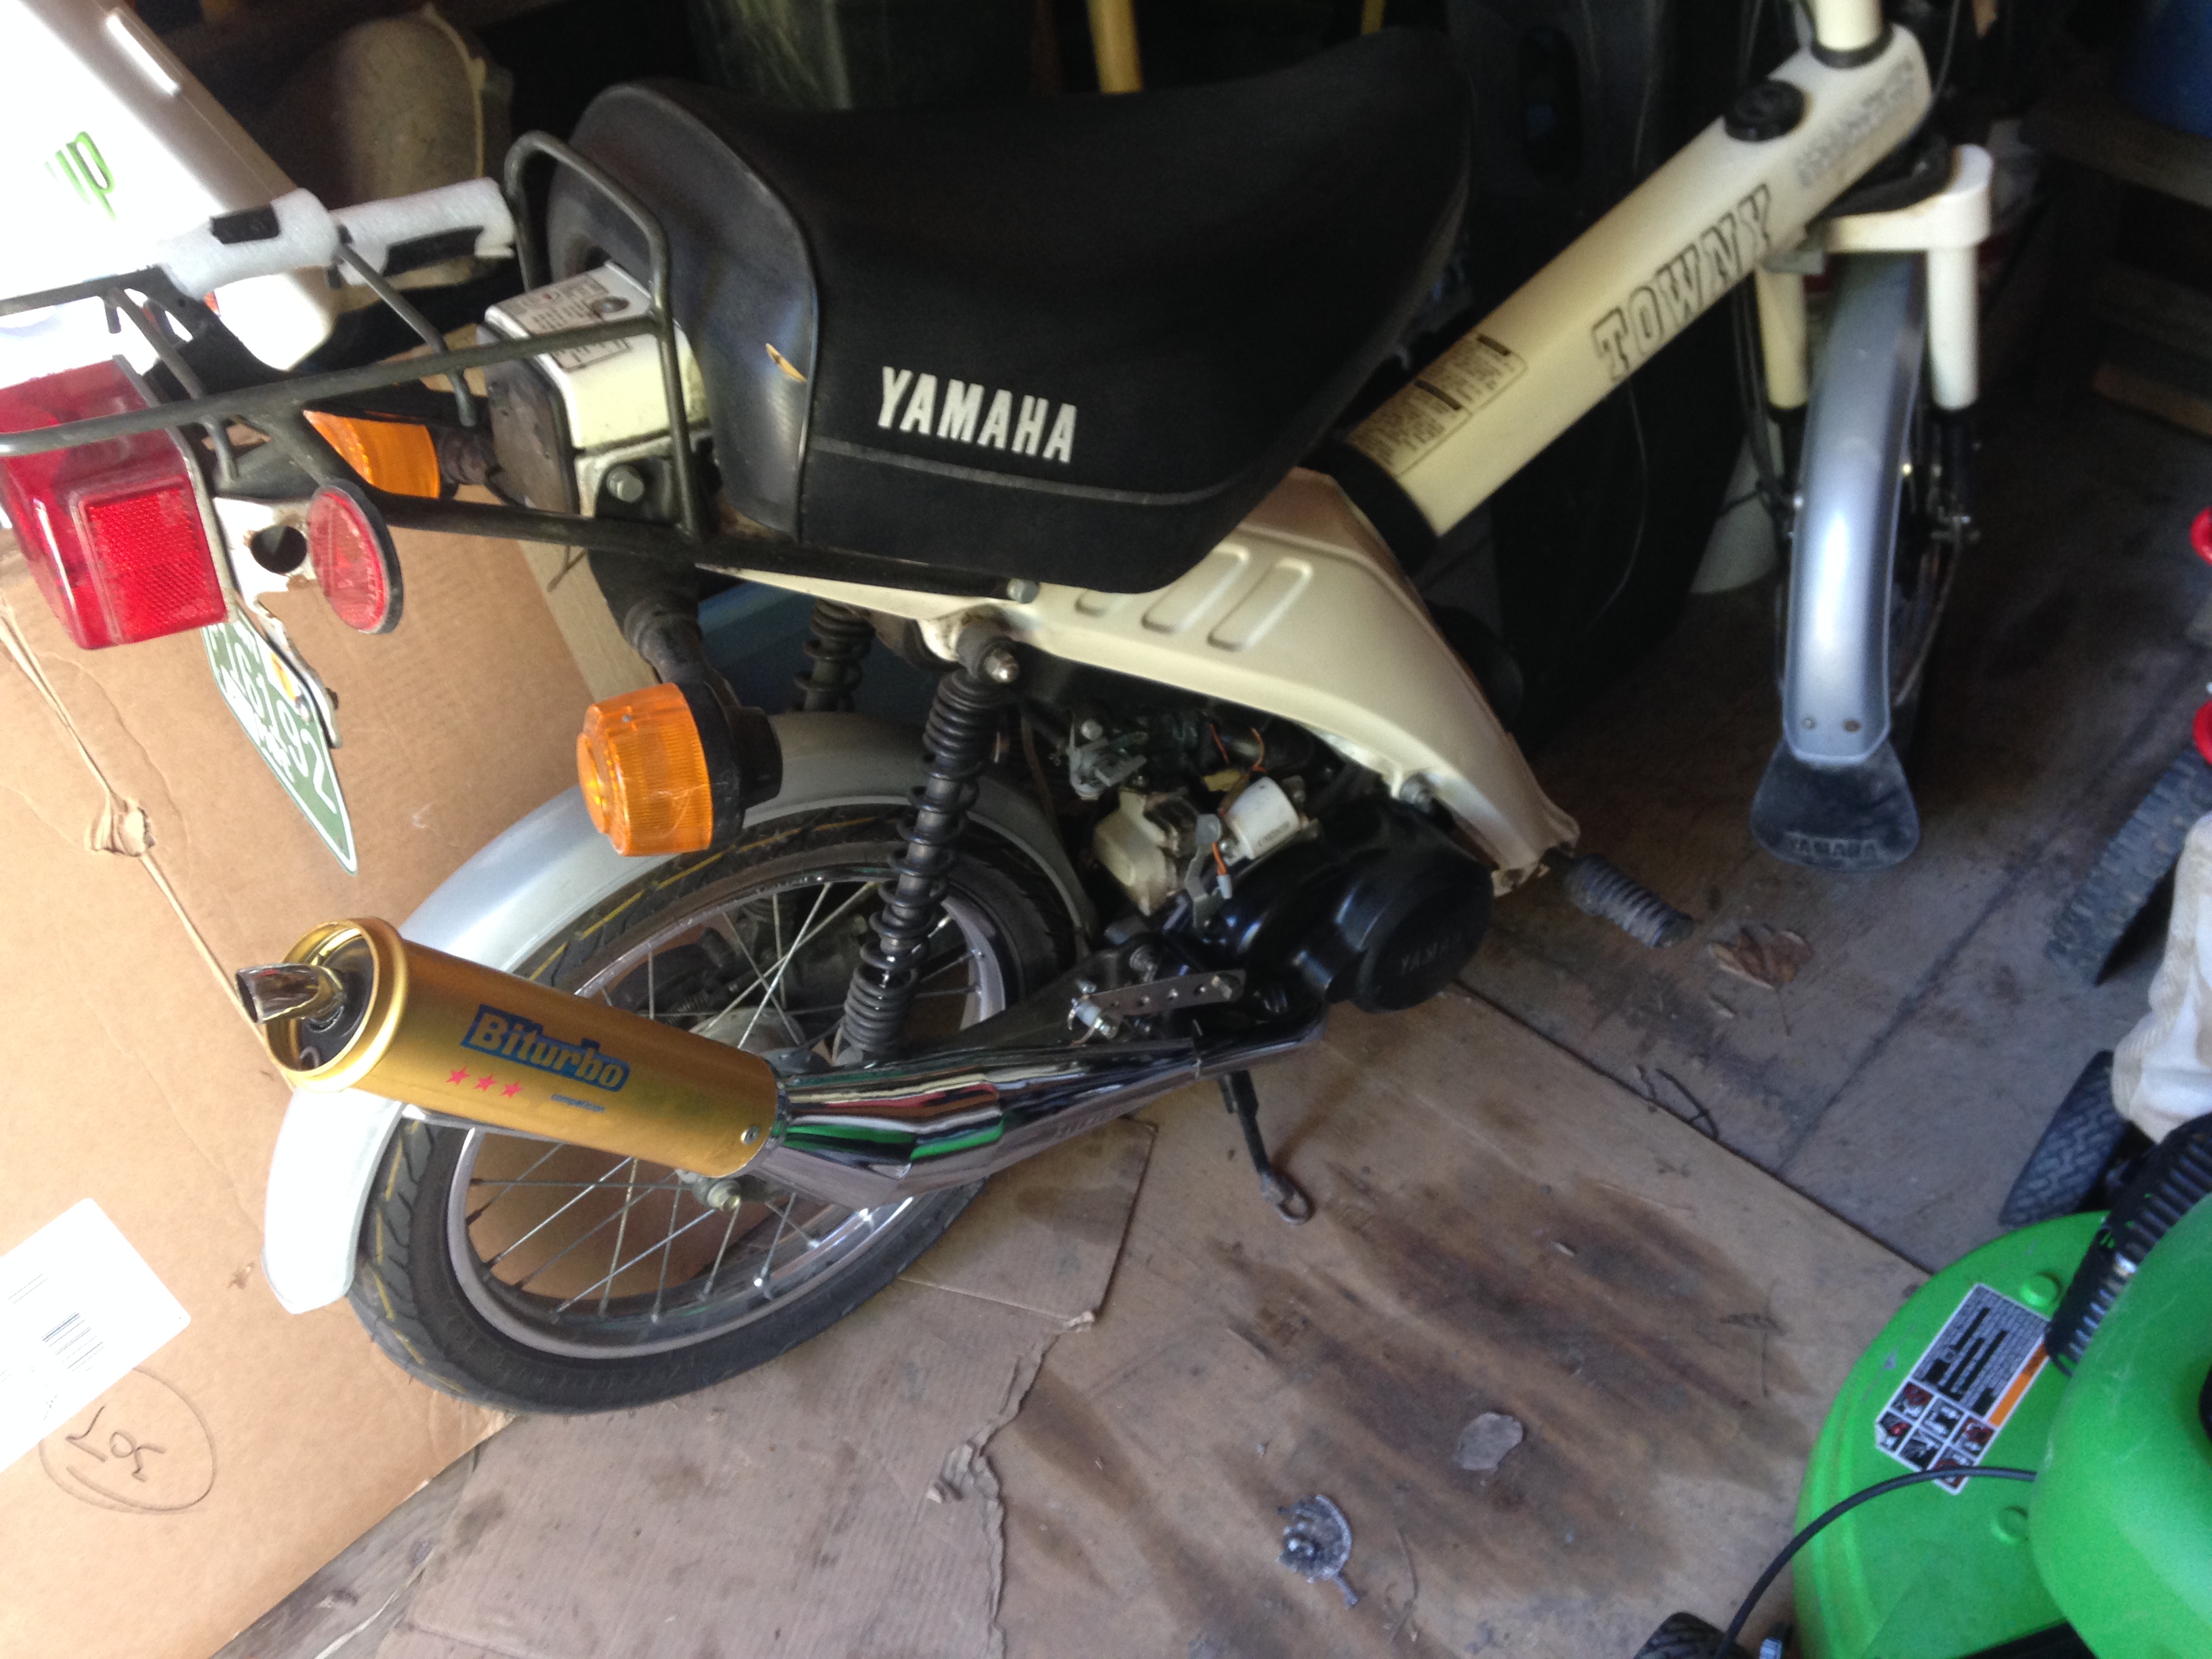
I bought a Biturbo exhaust made for the Tomos A35 and mounted it up to the Towny. It will also work with a bit more modifications on the QT50. I just took a dremel to one of the flange bolt holes and slotted it to the end. I bought a 6″ or so chrome metal exhaust bracket and attached the exhaust to the frame with that. I also used a Malossi exhaust gasket to seal it up. I may slot out the other flange bolt hole in the future just to center it more.
It’s pretty loud especially compared to the stealth silence of the stock exhaust. I gained maybe 3-4 mph with it but lost some bottom end. I’ll experiment with the packing material and see if I can’t quiet it down some. The bolts vibrated loose on my first ride. On the next ride, they were fine. I’ll keep an eye on them. You really don’t want an air leak at the base of the cylinder. I have a 75 jet in it for now but will try a 77.5. Anyhow, it does about 40mph now.
6/6/17 update
I was asked what was needed to add the biturbo to the Towny or to a Yamahopper.
You’ll need the following:
bigger main jet from stock 70 (probably 77.5 and an 80)
You’ll need to dremel (with a cutting disc) the one side of the header where it connects to the bottom of the cylinder because the biturbo header bolt holes don’t match up with the cylinder bolt holes. You should be able to see what I did in the video. You’ll also probably want a nylon spacer or two from your hardware store for use with the chrome metal exhaust bracket and an extra stainless steel bolt, washer and locking nut (also for the chrome exhaust bracket).
I was also looking at something like this for extra support but never got around to it
You would need to determine the proper size.
The biturbo will sit differently on the hopper than the towny but it should work. The main challenge is just connecting the exhaust with the stock exhaust support holes in the hopper by using the chrome exhaust bracket. I only used one of the stock exhaust support holes but it would be better to use both as my exhaust vibrated loose on the first ride. If it gets loose, it will let in more air and you risk damaging your engine.
You might be able to use this
to clamp around exhaust and then bolt into lower exhaust support hole. You may need another nylon spacer and another chrome metal exhaust bracket. That clamp might be too loose but you could fill the space with a strip of metal. Just bend it too shape.
Orange clutch springs are what you probably want to make up for the loss of bottom end.
Anyhow, it was loud as hell and I probably got 4-5 mph +. I’ve got too many loud nopeds so I took the Towny back to stock as it’s nice to have super stealth mode again. That towny is super quiet in stock form. I should put this up in an article.
I would get a temp gauge as well. Try to keep it below 370. A 77.5 jet should work unless you’ve done other mods. But if it runs too hot, shut it down and put an 80 in. Don’t seize your shit if you don’t have to.
Hope this helps.
10/1/17 update – I’ve since replaced the left crankshaft seal on this one. I ran it with a 70 jet but that was too small as temperatures were in the 360s. I’ve gone to a 76 jet. I need to replace the right crankshaft seal. I took off the cylinder head which had a layer of carbon inside. I had previously put on new tires which make a world of difference over stock skinny tires. I’ve got a set of Boyesen reeds which I will try on this Towny or my other Towny that I recently acquired (also the subject of the below video series).
Getting a non-running moped running
10/2/2017 – I’m going to have to differentiate between the two White Townys. On my original white towny, high temperatures were in the 380s. I had changed the left crankshaft seal. I went ahead and changed the right one as well but temperatures were still in the 370s (the right seal is a little challenging with the two clutches and all the associated parts; I’ll do it again on my second Towny and document the process). I looked it up on the manual and Yamaha is recommending 30 ft/lbs torque on the primary drive gear. I think the qt50 is just 22 ft/lbs. On my second white Towny, I can barely get temperatures much above 300F. The only difference between the two is I have a SHA carb on the second one and a stock carb on the original with a 76 jet. I think I’ll go to a higher jet and see if that helps.
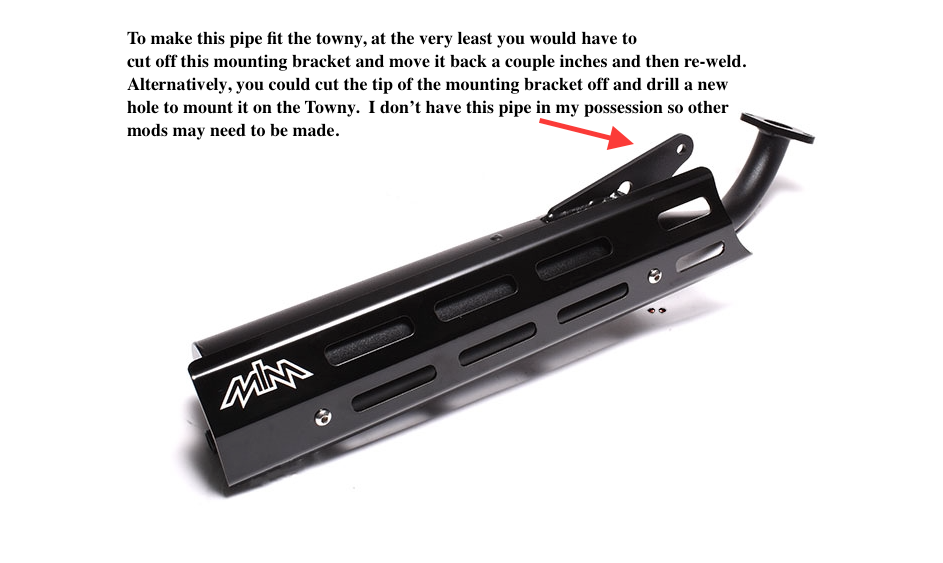
I wish I still had this pipe to experiment with on the Towny. The cases on the Towny are longer than on the qt50 and that is your main problem with fitting a qt50 pipe on the Towny. My only other concern with this pipe is header length. The pipe’s header length may be too short to get all the way under the engine and back to the mounting point.